Making Turns
Making a Two-Point Turn

How to Make a Two-Point Turn Safely
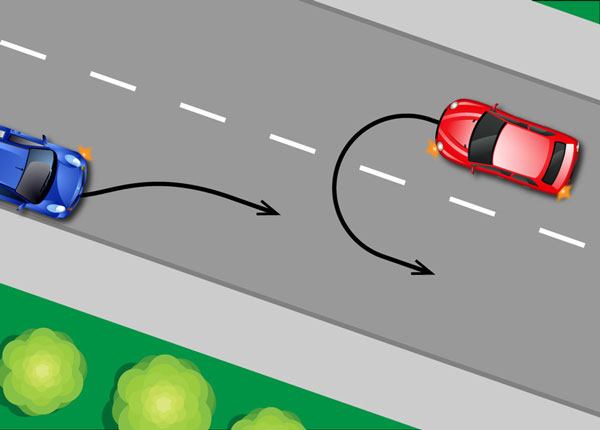
Updated Oct. 30, 2020

When the roadway is not wide enough to make a U-turn, drivers can use a two-point turn to change direction. This will usually only be possible on quiet suburban streets, when there is an available driveway on the left or right side of the road to facilitate the turn. Two-point turns using driveways on the left are more dangerous, as the driver must reverse the vehicle into a traffic lane.

You can expect to be assessed on two-point turns during the DMV driving exam. If possible, practice this maneuver in an empty parking lot using cones before doing so on a road. This will be every bit as beneficial to your development and you will not have to consider other drivers.

Two-point turn: driveway on the right

If you need to change direction, the street is relatively clear and there is a driveway available on the right, you may execute a two-point turn using these steps:

  1. 1

    Use your indicator lights or hand signals to signal your intention to turn into the driveway, as you approach it.

  2. 2

    Drive past the driveway and stop the vehicle once you have cleared it completely. Shift into “reverse”.

  3. 3

    Check all the way around your vehicle for hazards, using your mirrors and turning to check your blind spots. Only proceed when you are certain it is safe.

  4. 4

    Begin reversing onto the driveway. Leave your turn signal on and move slowly.

  5. 5

    Come to a complete stop when your vehicle is centered in the driveway and the front wheels are completely clear of the road.

  6. 6

    Now, activate your left turn indicator and shift into “drive”. Do not pull out of the driveway yet.

  7. 7

    Drivers, cyclists and motorcyclists already on the roadway have the right-of-way. You must yield to these road users and any pedestrians wishing to cross the driveway from the sidewalk. Check thoroughly for traffic approaching from both directions.

  8. 8

    Pull into the roadway to complete your two-point turn, as soon as it is safe to do so.

Two-point turn: driveway on the left

You should only use a driveway on the left to execute a two-point turn when there is no right-hand driveway available, as this maneuver is trickier and more dangerous. Pulling into the driveway will be easier as you are traveling forward. Unfortunately, this means you must then reverse onto a roadway that may be occupied by other traffic.

If you must complete a two-point turn on the left, follow the steps outlined here:

  1. 1

    Signal your intention to turn as you approach the driveway, using indicator lights or hand signals.

  2. 2

    Make sure you can safely pull onto the driveway, checking for motorists behind you and traffic coming from the opposite direction.

  3. 3

    Turn left onto the driveway when the way is clear. Two-point turns on the left require you to enter the driveway facing forward.

  4. 4

    Center your vehicle on the driveway and ensure your rear end is not sticking out into the street.

  5. 5

    Make sure no traffic is approaching you and that no pedestrians are about to cross the driveway. Check all the way around your vehicle by turning to see blind spots and using your mirrors.

  6. 6

    Reverse onto the road slowly and with caution.

  7. 7

    Once you are completely clear of the driveway and realigned with the traffic lane, you may shift into “drive” and continue your journey.

Two-point turns on private property

In most cases, you will be making your two-point turn on private property. This means some extra consideration should be used when selecting an appropriate driveway. Do not just opt for the closest and most convenient turning point. Instead, select a driveway that is free from obstacles and other vehicles to minimize the likelihood of damaging another person’s property. Never try to squeeze onto a driveway already taken up with another vehicle.

Would you pass a driving test today?

Find out with our free quiz!

TAKE A FREE TEST

Like the article? Give us 5 points!

Click a star to add your vote

5.0 out of 5 stars based on 6 votes.

Read next

Three Point Turn
Making Turns 8 of 9

Three Point Turn

Three-point turns are more complex than two-point turns and U-turns. You must know how to execute a safe three-point turn, as they are a standard point of assessment on practical driving tests state-wide. If you need to reverse your direction of travel on a street that is too narrow for a U-turn and has no driveways to allow a two-point turn, making a three-point turn will be your only option.

Making a U-Turn
Making Turns 9 of 9

U-Turns

Making a U-turn is the quickest and easiest way to turn your vehicle around should you need to reverse your direction of travel. This may happen if you find you are traveling in the wrong direction or if you accidentally over-shoot your destination.

Passing Basics
Passing 1 of 3

Passing Basics

Passing another vehicle immediately puts you and every road user around you at risk, no matter how safely you execute the maneuver. Passing-related collisions are often high-speed and head-on, which sadly means they are usually fatal. All drivers must learn how and where they should pass other vehicles, in addition to situations in which passing is forbidden.

Review
Making Turns 1 of 9

Making Turns

The art of making turns correctly is a skill often neglected by learner drivers. There are more techniques involved in turning than simply moving the steering wheel in the direction you wish to go. When turning to completely reverse your direction of travel – perhaps because you have missed your destination or are going the wrong way – you have three main options. These are U-turns, two-point turns and three-point turns.

Making Turns 2 of 9

Protected Turns

Protected turns are made at signal-controlled intersections when a green arrow light is present. When a turn is protected, all other streams of traffic, cyclists and pedestrians are halted by red traffic signals. This makes protected turns safer and easier to negotiate than unprotected turns, as the chances of colliding with another road user are minimized.

Making Turns 3 of 9

Unprotected Turns

Any and all turns made at intersections without the aid of a green arrow signal qualify as unprotected turns. When the turn is unprotected, you must yield the right-of-way to oncoming traffic and pedestrians before turning.

Making Turns 4 of 9

Making a Right Turn

While all course changes require knowledge and skill, making a right turn is easier, safer and more straight-forward than making a left turn. When turning right you do not need to worry about traffic traveling in the opposite direction from the road you are entering, which makes things a whole lot simpler. In some areas you can even turn right against a red traffic signal

Making Turns 5 of 9

Making a Left Turn

Turning left is riskier and demands more caution than turning right, because the turn will take you across the path of traffic which is traveling toward you, from the opposite direction. Be sure to signal your intention to turn left as early as possible, while observing any right-of-way laws that are relevant to your situation. Drivers must also take particular care when turning left onto a street from an alley or driveway and learn how to use a center left turn lane.

Making Turns 6 of 9

Center Turn Lane

Center left turn lanes are also referred to as two-way left turn lanes. These lanes are designed to improve the flow of traffic at busy intersections, by allowing drivers to safely turn left without interfering with motorists traveling straight on. You may use the two-way left turn lane when turning left onto the roadway from an alley or driveway.