Making Turns
Three Point Turn

Making a Three-Point Turn Step-by-Step: Y-Turn and K-Turn Tips

Updated Sept. 30, 2019

Three-point turns are more complex than two-point turns and U-turns. You must know how to execute a safe three-point turn, as they are a standard point of assessment on practical driving tests state-wide. If you need to reverse your direction of travel on a street that is too narrow for a U-turn and has no driveways to allow a two-point turn, making a three-point turn will be your only option.

Our step-by-step instructions will help you understand how three-point turns work and how they must be executed. We have also included detailed diagrams to make sure you can visualize each stage of the maneuver effectively.

Your state driving manual will also contain guidance on three-point turns. Note that these turns are sometimes referred to as Y-turns and K-turns. While practicing this maneuver, you must keep in mind that touching the curb during a three-point turn will likely amount to a fail on the driving exam.

Three-point turn step-by-step

Safely and successfully completing a Y-turn is largely a matter of choosing the right spot. You must be able to see well in both directions; some state handbooks specify a visibility-distance of 500 feet. Whether this is provided in your driving manual or not, 500 feet is a good distance to aim for. You must also be at least 200 feet from the nearest intersection. Do not attempt a three-point turn in heavy traffic.

Once you have chosen a good place to complete your three-point turn, follow this step-by-step guide:

  1. 1

    Stop your vehicleas near to the right side of the road as possible. Activate your left turn signal.

  2. 2

    Check for traffic in both directions. You will need roughly 20 seconds to complete the Y-turn. Conduct your check using mirrors AND turning to view blind spots.

  3. 3

    When it is safe to begin the maneuver, pull forward slowly while turning the steering wheel all the way to the left.

  4. 4

    Without allowing your wheels to touch the curb, pull as close to it as possible and straighten your wheels at the last moment, by steering to the right.

  5. 5

    Activate your right turn indicator and shift the vehicle into “reverse”. At this point you must conduct another check around the vehicle, looking for traffic approaching from both directions.

  6. 6

    Start to reverse slowly, while immediately turning the wheel hard to the right. As above, straighten your wheels and stop just before you connect with the curb. Make sure you do not touch the curb.

  7. 7

    Having stopped, shift the vehicle into “drive” and once again check for oncoming traffic.

  8. 8

    Complete the turn by driving forward into the correct lane when the way is clear.Accelerateto an appropriate speed.

Steps to Making a Three Point Turn
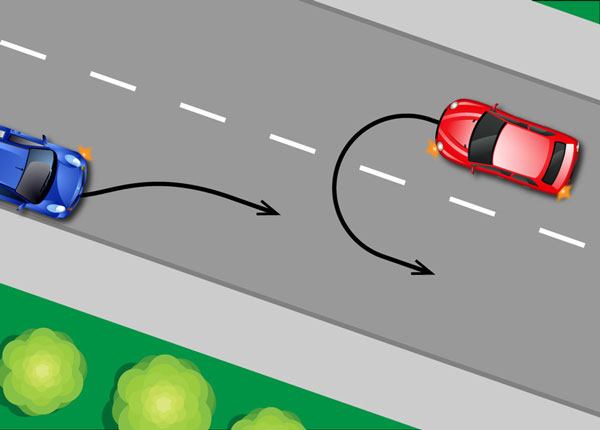
Using the three-point turn technique you can turn the car around in narrow spaces, where making a regular U-turn is not an option.

Illegal Y-Turn

Drivers must NEVER attempt to make a three-point turn in the following situations:

  • At or close to the top of a hill.
  • On a curved stretch of road.
  • On interstate freeways.
  • Where they cannot clearly see for 500 feet in both directions.

Keep in mind that these are general restrictions regarding three-point turns. As making a Y-turn under any of these conditions would be hazardous, it is likely to be illegal in your state. However, other state-specific restrictions may apply in addition to those discussed here. Make sure you read about Y-turns in your state driving manual before attempting them on the road.

Would you pass a driving test today?

Find out with our free quiz!

TAKE A FREE TEST

Like the article? Give us 5 points!

Click a star to add your vote

5.0 out of 5 stars based on 4 votes.

Read next

Making a U-Turn
Making Turns 9 of 9

U-Turns

Making a U-turn is the quickest and easiest way to turn your vehicle around should you need to reverse your direction of travel. This may happen if you find you are traveling in the wrong direction or if you accidentally over-shoot your destination.

Passing Basics
Passing 1 of 3

Passing Basics

Passing another vehicle immediately puts you and every road user around you at risk, no matter how safely you execute the maneuver. Passing-related collisions are often high-speed and head-on, which sadly means they are usually fatal. All drivers must learn how and where they should pass other vehicles, in addition to situations in which passing is forbidden.

Step by Step Instructions to Passing
Passing 2 of 3

Passing: Step-by-Step

When learning to pass another vehicle, the most important skill that new drivers must develop is accurately judging whether there is enough space to pass safely. Overestimating how much room you have could cause a serious collision. When passing at highway speeds, drivers need a 10 to 12 second gap in opposing traffic to execute the maneuver safely. During this gap, you will travel approximately 800 feet, or one third of a mile.

Review
Making Turns 2 of 9

Protected Turns

Protected turns are made at signal-controlled intersections when a green arrow light is present. When a turn is protected, all other streams of traffic, cyclists and pedestrians are halted by red traffic signals. This makes protected turns safer and easier to negotiate than unprotected turns, as the chances of colliding with another road user are minimized.

Making Turns 3 of 9

Unprotected Turns

Any and all turns made at intersections without the aid of a green arrow signal qualify as unprotected turns. When the turn is unprotected, you must yield the right-of-way to oncoming traffic and pedestrians before turning.

Making Turns 4 of 9

Making a Right Turn

While all course changes require knowledge and skill, making a right turn is easier, safer and more straight-forward than making a left turn. When turning right you do not need to worry about traffic traveling in the opposite direction from the road you are entering, which makes things a whole lot simpler. In some areas you can even turn right against a red traffic signal

Making Turns 5 of 9

Making a Left Turn

Turning left is riskier and demands more caution than turning right, because the turn will take you across the path of traffic which is traveling toward you, from the opposite direction. Be sure to signal your intention to turn left as early as possible, while observing any right-of-way laws that are relevant to your situation. Drivers must also take particular care when turning left onto a street from an alley or driveway and learn how to use a center left turn lane.

Making Turns 6 of 9

Center Turn Lane

Center left turn lanes are also referred to as two-way left turn lanes. These lanes are designed to improve the flow of traffic at busy intersections, by allowing drivers to safely turn left without interfering with motorists traveling straight on. You may use the two-way left turn lane when turning left onto the roadway from an alley or driveway.

Making Turns 7 of 9

Two Point Turns

When the roadway is not wide enough to make a U-turn, drivers can use a two-point turn to change direction. This will usually only be possible on quiet suburban streets, when there is an available driveway on the left or right side of the road to facilitate the turn. Two-point turns using driveways on the left are more dangerous, as the driver must reverse the vehicle into a traffic lane.